09 October 2013

Mini Milk Carton Holder


Mini Milk Carton Holder

As promised I have put together a picture tutorial of how I made the holder for two mini milk cartons.
I forgot to punch a handle in the carton I made for the instructions, but you can see how it looks on my finished products.  Here is a look at one of the Halloween holders I made last week.

Here we go with the tutorial.
*NOTE*
It should be 1" on the long side not 3/4"

*NOTE* The first score line should be 1" not 3/4"


Here is another finished holder.

That's it!  I hope you get a chance to try this cute holder. At the bottom of the post you can hit the printer friendly button and print this out to have on hand when creating!  Thanks for stopping by.  Be sure to come back tomorrow and check out my card for this week's Create with Connie and Mary color challenge.

 NICOLE's BLOG


29 September 2013

Gift Bow Angel Ornament


Tanya's Blog


Original Cindee Wilkinson's Angel...

Stampin' Up! Gift Bow Die Angel


Here is another unexpected way to use this die. Thank you to Catherine Steele for this great idea! Here is my version.

She only takes a few minutes to make. Here's what you need:

Gift Bow Bigz Die
1 1/4" Circle Punch
1 3/8" Circle Punch
1 3/4" Circle Punch
Word Window Punch
Brushed Gold Cardstock-arms and body (Gift bow Die)
Pink Pirouette Cardstock-face and arms
Champagne Glimmer Paper-halo
Vanilla Cardstock, 7/8" x 4 3/4" (banner)
Sassy Salutations Stamp Set
Cherry Cobbler Ink
Multipurpose Glue

 I die cut two bow tails and two of the small bows in Brushed Gold. Adhere the two small bow tails together so it forms her body. Use your bone folder to curl the arms and glue the tabs together. I first punched a 1 1/4" Circle from the Glimmer paper, then punched the 1 3/4" Circle over that, keeping the 1 3/4" punch down and center, so there was a little gap between the halo and the face. Glue that to the body. Punch a hole in the top and add your gold cording.
I added the face to the halo with glue and then glued that to the body.  Punch one Window Word and cut in half. Those are her hands and you can see my photo for placement.

Stamp your greeting in Cherry Cobbler, flag each end and curl a little with the bone folder and glue to the angel right above her hands.

Don't forget to sign and date the back of your angel.

Cindee's Blog


28 September 2013

How To Straighten Bowed/Bent Big Shot Cutting Plates - by Jamie Albanese


Sunday, September 15, 2013 (date posted by Jamie)


How to Prevent Damage and Repair Big Shot Cutting Plates
 
Much like when my hubby takes my car in for an oil change and tire rotation, he's looking out for our safety and the car's performance.  Prevent issues with these simple tips for your Die-Cutting Machine!   See this Video Tutorial on how to Flatten/Straighten Bowed/Bent Big Shot Die-Cutting Plates with a quick trip to your kitchen!!
Check out this video below to see the Do's and Do NOT's of this quick and easy process!
I've been asked more than once (too many times to count, really) how to deal with bowed or bent cutting boards for the Big Shot. 

Preventative:

1. The Big Shot machine comes with 2 clear plates.
Right off the bat mark one for cutting. Use only the cutting mat on top of your sandwich stacks. Be sure to rotate the cutting plate back to front and side to side.

It is normal for your cutting plate to get "cut up" with marks from your dies.

BUT if your cutting plate starts to curl do not attempt to flatten it with your heat tool or by running it through your machine "bump" side up in a tight stack. It may crack and break!

It is still useable with a curl but you are now committed to running it through your machine with the ends curled up. You may also have to push the curled up end down to start your stack when running it through your machine.
Ideally it would best to have 3 plates on the go - 1 for cutting, 1 for the bottom of the stack and another 1 to use for embossing only as a top plate.  I’ve JUST Stickered my plates as I think it will help us all in keeping them straight – literally and figuratively ha, ha, ha.

2. Each machine is slightly different. Each user should play with their machine to "get to know it". Don't be alarmed if the recommended sandwich stack does not work in your machine. Simply experiment and make adjustments.

3. Once you get to know your machine you may want to run some samples through and record on them your unique recipes if different. You may also want to make your own laminated "recipe" shims and keep them with your machine.


See the middle of the video, lol, as I have a cautionary Tale to Tell!!
My Tail of Woe - lol.
Play this video and leave me a comment on what you think.  Share, Pin, Email, Facebook, Tweet, Google+... and Follow me on YouTube, Pinterest, LinkedIn, Instagram and more!

I love that I was able to experience what TO DO and What NOT TO DO - lol... I hope that this inspired YOU to make your platform cutting boards/plates last longer!
20 Minutes to awesome results!!
Flat, again, Clean and more Clear.... the Big Shot Die-Cutting Tool is a FAVORITE tool of mine!!  I love that it's a simple tool yet creates amazing WOW Projects, Texture, and more!


Take a peek at Jamie's Blog

Frame Card With Flower - by Dawn


Frame Card Video:

Frame cards for Advisory Board  2013
Hi Stampers :
 Here are the items we will be using today :
 Modern Medley Designer paper #126926
  • cut at 4" x 6"
Black card stock # 121045
  • cut at  7" x 10 1/4"
  • cut at  4" x 6"
Finished frame  I used the following items :
Apothecarty Accents framelits # 127003
Oval Framelits # 129381
Feel Goods stamp set
  • (w)# 131916
  • (c)# 129684
Hot Glue ( Local store)
Basic Rhinestones # 119246

Making the Card:


Making the Flowers:
 Paper Flowers

Hi Stampers :
Here are the supplies we will be using today :
Big Shot #113439
Fun Flowers Bigz L die #121812
Cherry Cobbler card stock #119685
  • cut 4 pieces at 5 1/2" X 8 1/2"
Early Espresso classic ink #126974
Stamping Sponges #101610
Spray bottle  filled with rubbing alcohol & Shimmer Paint
Candy Dots Brad bases #132293
Paper-Piercing Tool #126189
Paper -Piercing Mat #126199
Large Basic Rhinestone #129324

Paper Flowers Video:


A HUGE thanks, as always, to Dawn Griffith. Her amazing videos can be found HERE


11 September 2013

Pop-Up Swallowtail Butterfly Card - by Jennifer Blomquist


A Fun Pop-Up Card with Swallowtail Tutorial

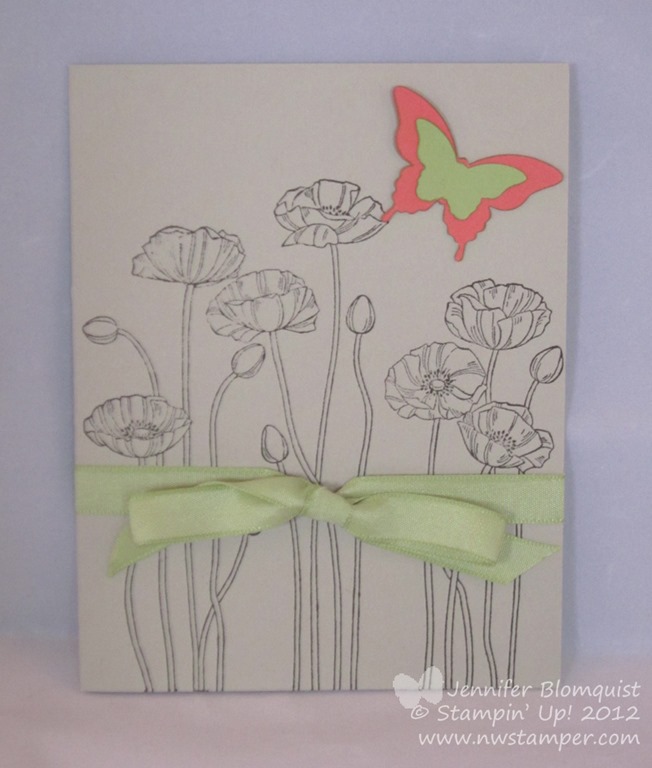
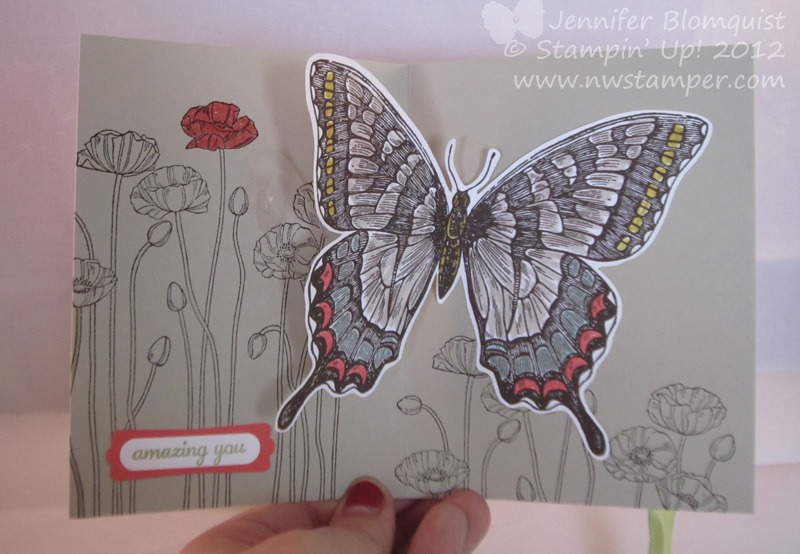
One of the cards that really struck me was a cool card that used the Swallowtail butterfly to create a surprise pop-up on the inside of the card.  I thought it was extra cool because when you look at that stamp image, it is too big to fit well on a card front and so I never would have thought it would have thought to try it on the inside of a card.

Here is the front of the card… I kept it simple since we were going to be focusing on the details inside the card.


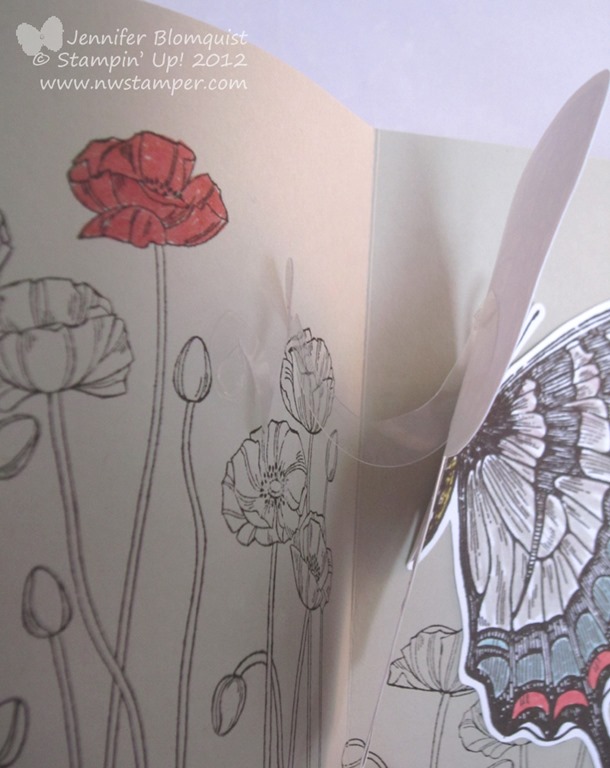
Then you untie the ribbon (which you need so the card doesn’t try to push open on you when you aren’t ready), open it up and hello, butterfly!


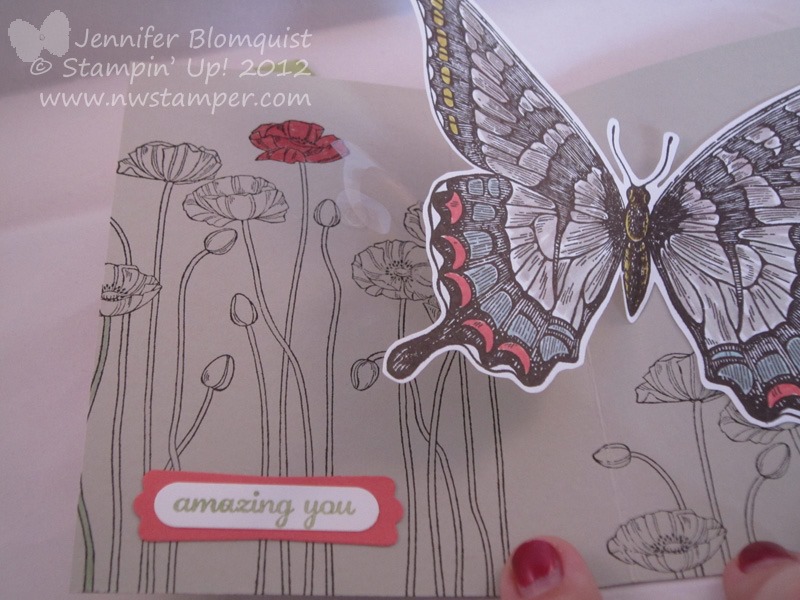
If that is a little hard to see, here is another angle to help you see the pop-up effect.  I also used the Pleasant Poppies background stamp to give the effect of the butterfly flitting through the flowers.


To create this pop-up effect, you want to do the following:
  1. Start by stamping and coloring your Swallowtail butterfly image. 
  2. Then cut out the butterfly. 
  3. Gently fold the butterfly image in half (you don’t have to press hard to crease it, just make sure it is set to fold how you want when the card is closed.
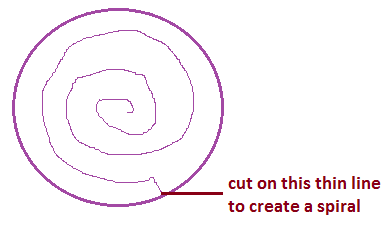
  4. imageTake a piece of window sheet and punch a 1-1/4” circle out.
  5. Cut a spiral into the 1-1/4” circle as shown in my poorly drawn image to the right.  
  6. On the “top” side of your spiral, attach a glue dot to the center of your spiral.  Attach another glue dot to the “bottom” side of your spiral at the outside end of the spiral.  (it doesn’t really matter which side is top and bottom, as long as your glue dots are on the opposite sides of the spiral)
  7. Glue the right wing of the butterfly to the right side of your card inside.
  8. Fold the butterfly in half and press the window sheet spiral onto the backside of the left wing with the glue dot in the center of the spiral sticking to the wing.
  9. Hold the butterfly down so it is folded in half and close the card.  This will allow the left side of the card inside to stick to the glue dot on the edge of the spiral.
  10. Open the card and check if you like how much of a pop you get with your butterfly.  Reposition the spiral as needed to get it just how you like.

Hopefully that made sense!  If not, let me know and I’ll try to put together a video on how to do the pop-up effect.


Jennifer's Blog 

08 September 2013

Label Framelets Purse


Labels Framelit Clutch Purse

This is one of the projects (each person picked their favorite new in color as the base) my Big Shot Club members and guests created this past weekend at the “You’ve Been Framed” class. The focus of the class was on framelits and different things you could do with them! 

This 3D clutch purse is made out of the Labels Framelits (CASE’d the idea from another demonstrator, Jeannine Tarrio). I added my own personal touch by changing out the closure at the top with the Silver Glimmer Paper punched out with the 1/2″ Circle Punch and add some framelit embossing around the edges of the purse! Super easy to do and fun! All you need to do is flip the Framelit over (blade side away from the paper) and run it through the Big Shot Die Cutting Machine.

Framelit Clutch
 
The KREATION featured products:

Stamp Sets: Mixed Bunch (Wood Mount 125535, Clear Mount 125537)
Paper: Silver Glimmer Paper (124005), Raspberry Ripple (126842), Basic Black (121045), Whisper White (100730)

Ink: Raspberry Ripple (126859)

Tools: Big Shot Die Cutting Machine (113439), Polka Dots Textured Impressions Embossing Folder (117335), Labels Framelits (125598), Blossom Punch (125603), 2-1/2″ Circle Punch (120906), 1/2” Circle Punch (119869), Simply Scored Scoring Tool (122334), Paper Snips (103579), Tabletop Paper Cutter (106959), Sticky Strip (104294)


Mixed Bunch Stamp Set
Wood Mount 125535- $27.95; Clear Mount 125537- $21.95
Mixed Bunch Stamp Set 

Labels Collection Framelits
125598 – $26.95
Labels Framelits


Paper Flowers


Click here or see the below pictures for the free tutorial Stampin’ Up provided.
Paper Flower Tutorial

Paper Flower Tutorial Instructions